Building your own welding table can be cost-effective and satisfying. You don’t need to break the bank to create a sturdy and functional workspace.
Crafting a cheap welding table yourself allows you to customize it to your needs. Whether you’re a hobbyist or a professional, having the right setup is crucial. This DIY project can save you money and give you a sense of accomplishment.
Plus, you’ll have a table that perfectly fits your space and style. In this guide, we’ll explore how to build a welding table on a budget. You’ll learn about affordable materials, essential tools, and step-by-step instructions. Get ready to embark on a practical and rewarding DIY project!
Materials Needed
Creating your own welding table can be a rewarding project. Knowing what materials you need is essential. Here, we will break down the essentials and some optional add-ons.
Essential Materials
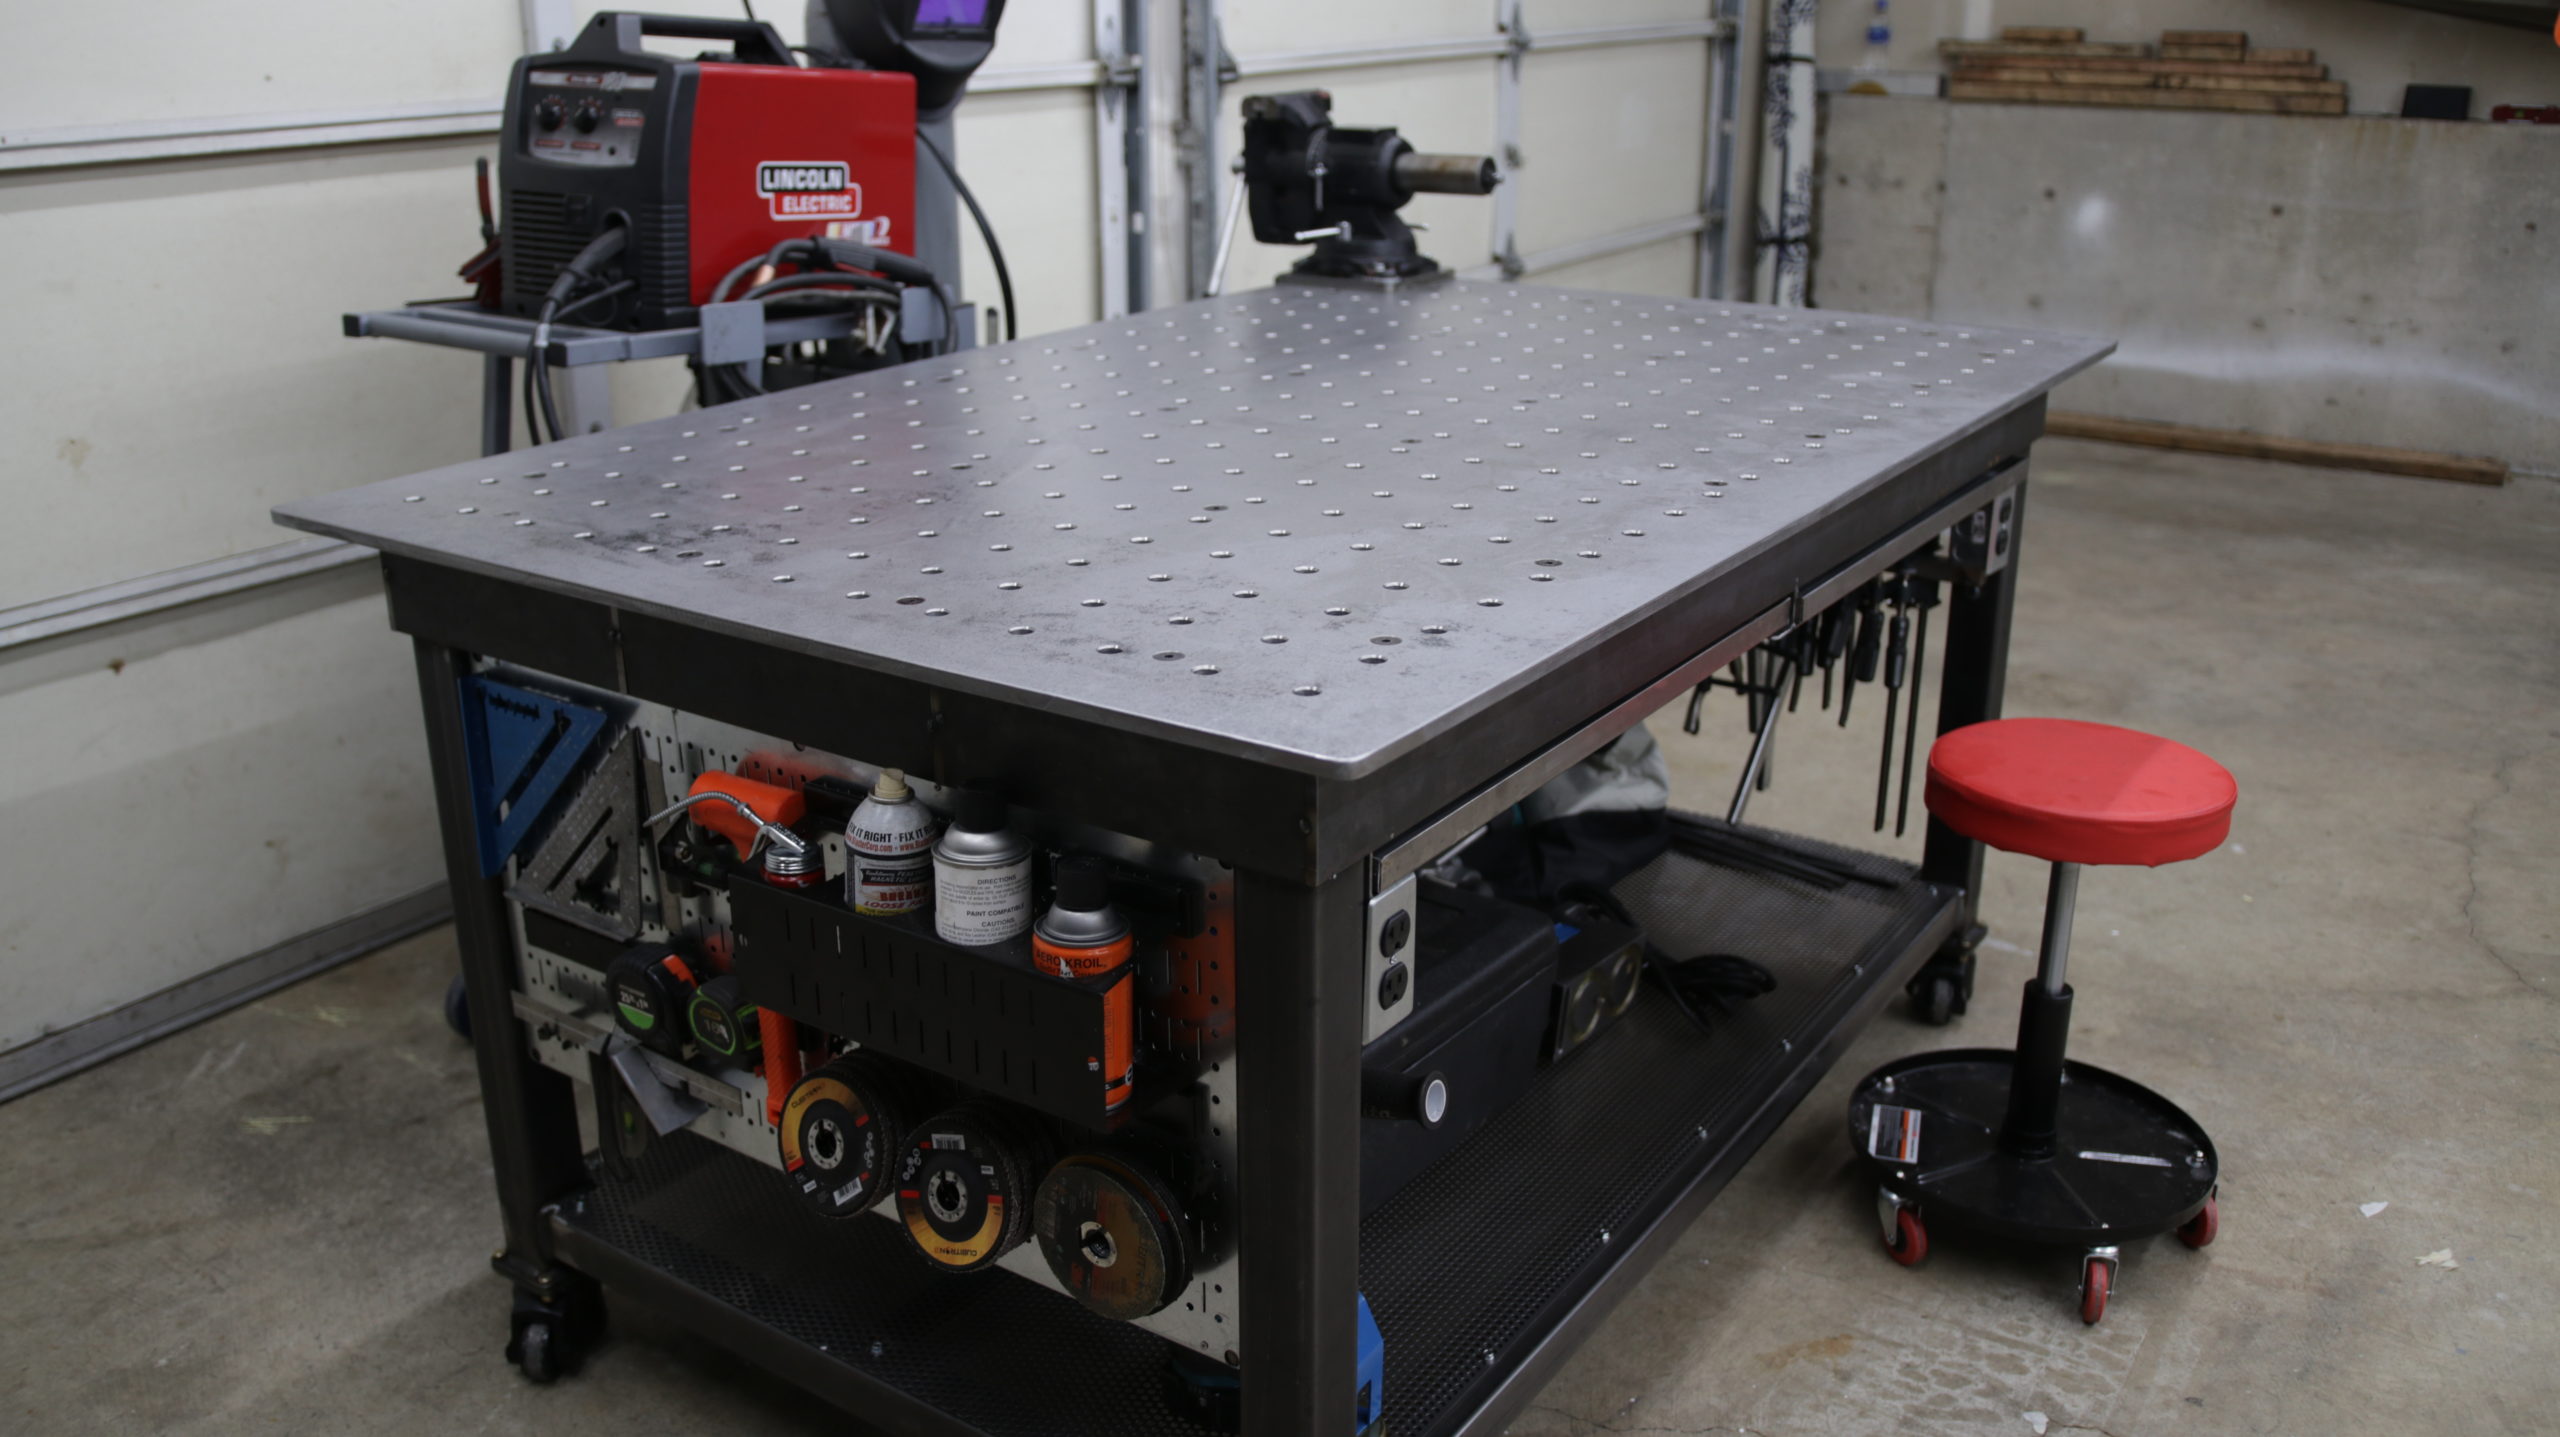
For a basic welding table, you need a few key items. First, you need a sturdy metal frame. Steel is a great choice for strength and durability. Next, you will need a flat, metal surface for the tabletop. A steel plate around 1/4-inch thick works well. Having metal legs will ensure stability. Square tubing is a popular choice.
Welding clamps are necessary to hold your pieces in place. A power drill and screws are needed for assembly. A measuring tape ensures accuracy. Safety gear is crucial. This includes welding gloves, a helmet, and protective clothing. Lastly, a welding machine is a must-have tool for this project.
Optional Add-ons
There are several additional items that can enhance your welding table. Wheels can make your table mobile. Locking casters are a good option for added stability. A shelf underneath the table can provide extra storage space. Having a vice can be very handy for holding workpieces.
Adding a metal grid to the surface can help with ventilation. A ground clamp and a grounding rod can improve safety. Using a power strip can make it easier to plug in tools. Magnetic holders can help keep your tools within reach. These add-ons can make your welding table more functional and efficient.
Tools Required
Building a cheap welding table DIY requires the right tools. These tools will make the process easier and more efficient. You don’t need a lot of expensive equipment. Both basic and advanced tools can help. Let’s break down the essential tools required for this project.
Basic Tools
Start with a tape measure. Accurate measurements ensure everything fits correctly. A square helps keep your table at perfect angles. Clamps are also essential. They hold the metal pieces steady while you work. You’ll need a drill for making holes. A good set of drill bits is important too. Don’t forget a marker for marking cuts and measurements. A grinder is useful for smoothing edges and cleaning welds. Protective gear is crucial. Always use gloves, goggles, and a welding helmet for safety.
Advanced Tools
Advanced tools can make the job easier. Consider a welding machine for joining the metal pieces. MIG welders are user-friendly for beginners. A chop saw can help make precise cuts quickly. A metal bender is useful for shaping metal parts. An angle grinder with different discs can also help. Use it for cutting, grinding, and polishing. A welding table itself can be useful. It provides a stable surface for your work. Lastly, a metal scribe offers more precise marking than a regular marker.
Design And Planning
Creating a cheap welding table is a rewarding project. It requires careful design and planning. This ensures your table is functional, safe, and fits your workspace perfectly.
Choosing The Right Size
First, consider the size of your workspace. Measure the area where you plan to place the table. Ensure there is enough room to move around it comfortably. Think about the projects you will work on. Larger projects need more space. A bigger table might be necessary.
Also, consider storage. Will the table have shelves or drawers? Plan for these when choosing the size. A compact design may be better if space is limited. You can always add storage solutions later.
Sketching The Layout
Next, sketch the layout of your welding table. A simple drawing helps visualize the final product. Include dimensions and key features. This will guide you during construction.
Think about the table’s height. It should be comfortable to work at. Consider adjustable legs if you work on different projects. Add space for tools and materials. This keeps your workspace organized and efficient.
Include safety features in your design. A sturdy frame and a flat surface are essential. This prevents accidents and ensures quality work. A well-planned layout makes building your table easier and more enjoyable.

Credit: m.youtube.com
Cutting The Pieces
So, you’ve decided to take on the exciting project of building your own welding table. That’s fantastic! One of the most crucial steps in this DIY adventure is cutting the pieces. This is where your welding table begins to take shape. Let’s dive into the details, but first, let’s make sure you’re prepared and safe.
Safety Precautions
Before you even think about turning on that saw, there are a few safety rules to keep in mind. Safety is the name of the game, after all. Make sure you’re wearing the proper gear:
- Safety glasses: Protect those precious eyes from flying sparks and debris.
- Gloves: Keep your hands safe from sharp edges and the heat of the saw.
- Ear protection: Sawing can be loud, so protect your hearing.
- Long sleeves: Helps prevent burns and cuts.
Also, ensure your work area is clean and free of clutter. You don’t want to trip over something while handling a saw, right?
Cutting Techniques
Now, let’s get into the nitty-gritty of cutting your pieces. The way you cut your materials will impact the final assembly of your table.
- Measure Twice, Cut Once: This old saying holds true. Double-check your measurements before cutting to avoid mistakes.
- Use a Steady Hand: Ensure your saw is steady and move it slowly through the material. Rushing can lead to uneven cuts.
- Clamp Your Material: Use clamps to hold the metal or wood in place. This helps in making precise cuts and keeps your hands safe.
When cutting metal, use a saw designed for metal cutting, like a hacksaw or a power saw with a metal-cutting blade. For wood, a standard wood saw will do the trick. Remember, practice makes perfect, so don’t be discouraged if your first few cuts aren’t flawless.
Building your own welding table is not just about the end result but also about enjoying the process. So, take your time, follow these tips, and you’ll have a sturdy table ready in no time. Happy building!
Assembling The Frame
Building a welding table on a budget is an exciting project. One of the key steps in this DIY adventure is assembling the frame. This part is crucial as it forms the backbone of your table, ensuring durability and functionality. Let’s dive into the process, breaking it down into manageable chunks.
Joining Methods
When it comes to joining the pieces of your frame, you have a few options. Each method has its pros and cons, so choose what works best for you.
- Welding: The most common method for joining metal. It’s strong and permanent but requires a welder and some skill.
- Bolt and Nut: This method is easier for beginners. You only need basic tools like a drill and wrenches. It’s not as strong as welding, but it can be undone if you need to make adjustments.
- Riveting: A middle ground between welding and bolting. Rivets are strong and require a rivet gun. It’s a bit more permanent than bolts but less so than welding.
Ensuring Stability
No one wants a wobbly table, especially when working with heavy materials. Here are some tips to ensure your frame is stable:
- Check for Level: Before tightening everything up, use a level to make sure your frame is even. This prevents wobbling.
- Cross Bracing: Adding diagonal supports can greatly increase stability. It’s an extra step, but worth it.
- Test the Strength: Once assembled, apply some pressure to different parts of the frame. If it moves, reinforce those areas before proceeding.
Assembling the frame is a bit like building the foundation of a house. Get it right, and the rest of your project will go smoothly. Take your time, double-check your work, and don’t be afraid to ask for help if needed. Remember, a solid frame means a reliable table for all your welding projects!
Adding The Work Surface
Adding the work surface to your cheap DIY welding table is a crucial step that can make or break your project. The surface you choose and how you attach it can impact both functionality and durability. So, let’s dive into this process and make sure we get it just right!
Choosing The Surface Material
The material you choose for the work surface should be both durable and heat-resistant. After all, welding involves high temperatures, and you need a surface that can withstand this. Here are a few options to consider:
- Steel Plate: The most common choice due to its strength and heat resistance. It can be a bit heavy, but it’s worth it.
- Aluminum Plate: Lighter than steel, yet still strong. However, it can be more expensive and is not as heat-resistant as steel.
- Fire-Retardant Plywood: A budget-friendly option. While not as durable as metal, it can work well for light-duty welding tasks.
Think about your needs and budget when picking the material. You don’t want to cut corners here, but you also don’t need to go overboard. I personally prefer steel, but if you’re just starting out, plywood can be a good temporary solution.
Attaching The Surface
Now that you’ve chosen your material, it’s time to attach it to the frame of your welding table. This step is simpler than you might think, but it requires precision. Follow these steps:
- Measure the Frame: Ensure you have the exact dimensions of your table frame. Measure twice, cut once!
- Cut the Surface Material: Using a saw or appropriate cutting tool, cut the material to fit the frame. Safety first—wear gloves and goggles.
- Drill Holes: For metal surfaces, drill holes in the corners and along the edges where you will attach it to the frame. Use a drill bit suitable for the material.
- Attach the Surface: Use bolts or screws to secure the surface to the frame. Ensure it’s tightly fastened to avoid any wobbling. A wrench or screwdriver will be your best friend here.
And there you have it! Your welding table now has a solid and reliable work surface. It’s like giving your table a new lease on life. Remember, a stable surface is key to safe and effective welding. So, don’t rush this step. Take your time and do it right.
Got any funny stories from your own DIY projects? Or maybe a tip that worked wonders for you? Share them in the comments below. We learn best by sharing our experiences, after all!
Finishing Touches
Adding the finishing touches to your DIY welding table can make a big difference. This step ensures your table is smooth, protected, and visually appealing. Let’s dive into the final steps: sanding and smoothing, and painting or sealing.
Sanding And Smoothing
Sanding the table surface removes rough spots and splinters. Start with coarse-grit sandpaper. Work your way up to finer grits. This process results in a smooth, even surface. Pay attention to edges and corners. They often need extra smoothing. Use a sanding block or electric sander for best results. A smooth surface makes welding easier and safer.
Painting Or Sealing
Paint or seal your table to protect it from rust and wear. Choose a paint designed for metal surfaces. A primer helps the paint adhere better. Apply the paint in thin, even coats. Let each coat dry completely. For sealing, use a clear sealant to keep the metal look. This step adds durability and a professional finish to your table.

Credit: m.youtube.com
Cost-saving Tips
Building your own welding table can save you a lot of money. But, did you know there are even more ways to cut costs? Yes, you can make your DIY welding table even cheaper! Here are some practical tips to help you save while building a sturdy, reliable table.
Reusing Materials
Why buy new when you can reuse? Scour your garage or storage for materials that can be repurposed. Those old metal pipes, scrap pieces of wood, or even an old door can be the perfect components for your welding table. Not only does this save money, but it also helps the environment by reducing waste.
For example, my neighbor Tom built his welding table using an old metal bed frame. It was strong, durable, and best of all, free! Think outside the box and get creative with the materials you already have.
Finding Bargains
Another great way to save money is by looking for bargains. Check local classifieds, thrift stores, or online marketplaces. You’d be surprised at what people are willing to give away or sell for cheap.
| Source | Pros | Cons |
|---|---|---|
| Classifieds | Low prices, local pickup | Limited selection |
| Thrift Stores | Unique finds, supports charity | Inconsistent inventory |
| Online Marketplaces | Wide variety, convenient | Shipping costs |
One day, I found a nearly new welding table top at a garage sale for just $10! Deals like this are out there. You just need to keep an eye out.
Remember to negotiate! Sellers often expect to haggle a bit. Polite bargaining can lower the price even more. And don’t forget to ask about discounts or bundle deals. Buying multiple items from one seller can often get you a better price.
By reusing materials and finding bargains, you can build a top-notch welding table without breaking the bank. Happy building!

Credit: rathasochenda.com
Frequently Asked Questions
What Surface Can I Weld On?
You can weld on clean, dry, non-flammable surfaces like metal or a designated welding table. Avoid welding on wood or concrete. Ensure proper ventilation and safety.
Do You Really Need A Welding Table?
Yes, a welding table is essential. It provides a stable, safe surface for precise welding. It improves work quality and safety.
Can I Use Cast Iron As A Welding Table?
Yes, you can use cast iron as a welding table. It offers a stable, heat-resistant surface. However, it can be brittle.
What Is The Easiest Diy Welding?
The easiest DIY welding is MIG welding. It’s user-friendly and ideal for beginners. MIG welding uses a continuous wire feed for simple operation. Minimal clean-up is required.
Conclusion
Building a cheap welding table is simple and affordable. With basic tools and materials, you can create a sturdy workspace. This DIY project saves money and offers customization. Feel proud of your homemade table. Enjoy welding with a setup tailored to your needs.
Happy building and safe welding!

