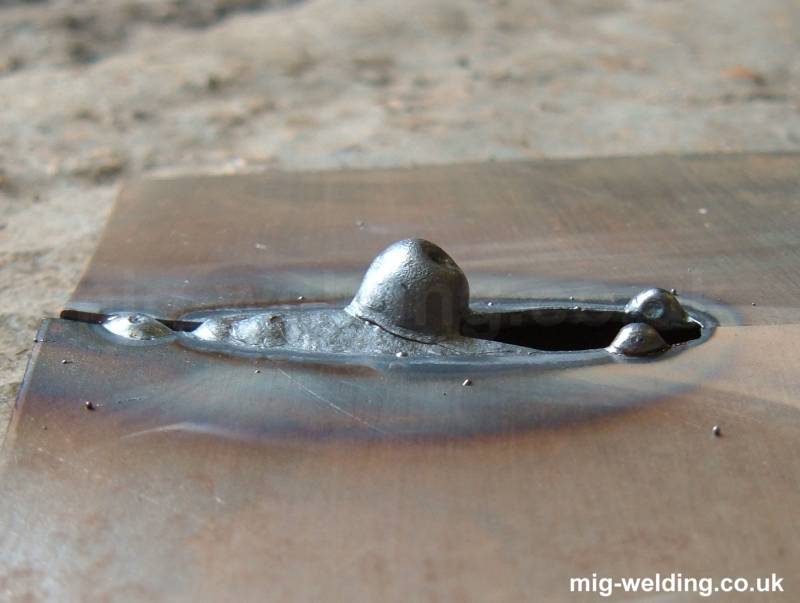
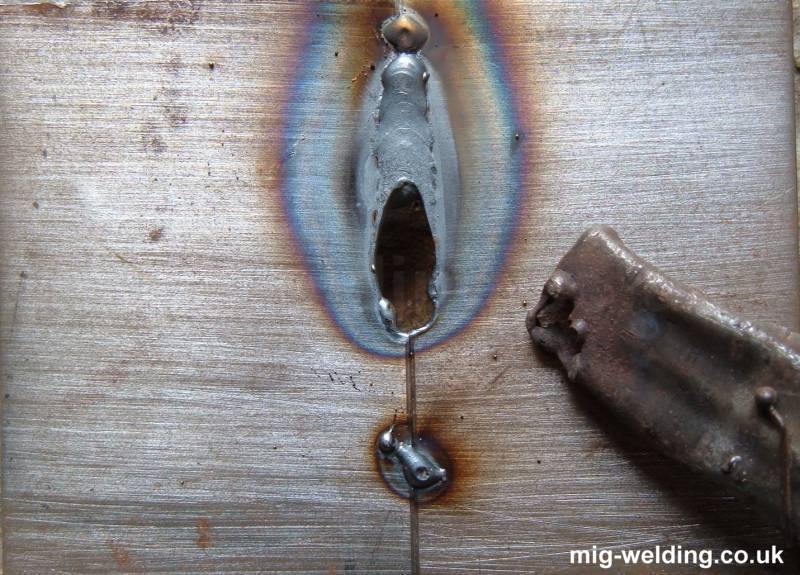
Welding blow through happens when the heat melts the metal, creating holes. This issue is common, but you can fix it with the right techniques.
Welding can be tricky, especially when the metal burns through, leaving unwanted holes. Whether you’re a beginner or have some experience, dealing with blow through can be frustrating. But don’t worry! Understanding the causes and learning how to adjust your technique can make a big difference.
In this post, we’ll explore practical steps to help you avoid and fix welding blow through. You’ll gain tips on controlling heat, managing your equipment, and improving your welding skills. Let’s get started and turn those blow through issues into smooth welds!

Credit: www.mig-welding.co.uk
Causes Of Welding Blow Through
Welding blow through is a common issue that can frustrate even experienced welders. It happens when the weld burns through the base metal, creating holes. Understanding the reasons behind this can help you avoid it. Let’s dive into the main causes of welding blow through.
Excessive Heat
One of the main culprits of welding blow through is using too much heat. When your welding torch is too hot, it can easily melt through the metal. Picture this: you’re cooking a steak, but you leave it on the grill for too long. What happens? It burns. The same goes for welding.
- High amperage: Using a higher amperage than necessary can cause the metal to overheat.
- Slow travel speed: Moving the torch too slowly concentrates the heat in one spot, leading to blow through.
To prevent this, you can lower the heat settings on your welder or increase your travel speed. Think of it like adjusting the flame on your stove while cooking. You want just the right amount of heat.
Improper Technique
Another reason for welding blow through is using the wrong technique. It’s not just about the tools; it’s how you use them. Even with the best welder, using poor technique can lead to problems.
- Incorrect electrode angle: Holding the electrode at the wrong angle can focus too much heat on a small area.
- Poor joint preparation: Not cleaning or aligning the joints properly can create weak spots susceptible to blow through.
Imagine trying to paint a straight line with a shaky hand. The result won’t be pretty. Similarly, with welding, precision matters. Practicing proper technique, such as maintaining the correct angle and preparing your joints well, can make a world of difference.

Credit: www.reddit.com
Choosing The Right Equipment
Welding blow-through can be a real headache, especially if you’re just starting out. One of the keys to avoiding this issue is choosing the right equipment. The right tools make all the difference. Think of it like cooking; you wouldn’t use a steak knife to spread butter, right? The same principle applies to welding. Let’s dive into some key areas to focus on when selecting your equipment.
Welding Machine Settings
First things first, your welding machine settings are crucial. If the settings are off, even by a little, you could end up with blow-through. Here’s a quick guide:
- Amperage: Too high, and you’ll burn through the metal. Too low, and you won’t get a strong weld. Check the material thickness and adjust accordingly.
- Voltage: Like amperage, voltage needs to be just right. Many machines come with a chart or guide to help you set the correct voltage.
- Wire Feed Speed: If you’re using a MIG welder, the wire feed speed must match the amperage. Too fast, and you’ll get blow-through. Too slow, and the weld will be weak.
Think of the settings as the recipe for a perfect weld. Follow them closely, and you’ll avoid many common pitfalls.
Appropriate Filler Material
Choosing the right filler material is just as important as the machine settings. The filler material acts like the glue that holds everything together. Here’s what you need to keep in mind:
- Material Compatibility: Make sure the filler material is compatible with the base metal. Using the wrong type can weaken the weld and cause blow-through.
- Thickness: Thinner filler rods are generally better for thinner materials. They melt faster and distribute more evenly, reducing the risk of blow-through.
- Cleanliness: Always use clean filler material. Dirt or rust can cause weak spots in the weld, increasing the likelihood of blow-through.
Remember, the right filler material can make your welding project smooth and hassle-free. Think of it as finding the right kind of glue for a broken vase; the wrong one just won’t do the job.
By paying attention to these details, you’ll find that welding becomes a lot more manageable. Remember, practice makes perfect. So, don’t get discouraged if you don’t get it right the first time. Happy welding!
Adjusting Heat Input
Welding blow through happens when too much heat is applied. This causes holes in the material. Adjusting heat input can help prevent this issue. By controlling power settings and travel speed, you can achieve better results.
Power Settings
First, check your welding machine’s power settings. Lowering the voltage can reduce heat. Start with the lowest setting and make small adjustments. This helps you find the right balance. Each material type may need a different setting.
Use a scrap piece to test your settings. This way, you can avoid damaging your main project. Remember, it is better to go slow and steady. Consistent power settings produce more reliable welds.
Travel Speed
Travel speed affects heat input as well. Moving too slowly can overheat the material. This may cause blow through. Try increasing your travel speed to reduce heat buildup. Practice on scrap materials to find the ideal speed.
Keep your hand steady and maintain a consistent speed. This helps distribute heat evenly. Faster travel speeds can also improve weld quality. Avoid lingering in one spot for too long. This prevents excessive heat concentration.
Proper Welding Techniques
Welding blow through can be a frustrating issue. Using proper welding techniques helps avoid this problem. By mastering specific methods, you can achieve cleaner welds. Let’s explore some key techniques.
Angle And Positioning
Keep the welding torch at an appropriate angle. A 15-degree angle works well. This reduces the risk of burning through the material. Position the torch close but not too near the workpiece. This ensures better control.
Maintain a steady hand. Avoid moving too fast or too slow. Consistency is key. Practice different angles and positions on scrap metal. This helps build muscle memory. Correct positioning can save you from common welding issues.
Puddle Control
Controlling the puddle size is crucial. Too large a puddle can cause blow through. Start with a small puddle. Gradually increase the size as needed. Watch the metal’s response. Adjust the heat input accordingly.
Use short bursts rather than continuous welding. This helps keep the puddle manageable. Pause and let the metal cool if needed. This approach reduces the risk of overheating. Remember, patience leads to better welds.
Material Preparation
Proper material preparation is key to fixing welding blow through. Clean the workpieces thoroughly and ensure they are of the right thickness. Adjusting the welder settings and using proper techniques can prevent this issue.
Preparing your materials is essential to avoid welding blow through. Proper preparation ensures a smooth weld and prevents common issues. Let’s explore the steps involved in material preparation.Cleaning And Degreasing
Clean surfaces are crucial for a strong weld. Dirt, oil, and rust can cause blow through. Use a wire brush to remove rust and dirt. For grease, use a degreaser or acetone. Wipe the surface with a clean cloth after applying the solvent. This ensures no residue remains. A clean surface improves weld quality and reduces blow through risk.Joint Fit-up
Proper joint fit-up is vital for preventing blow through. Gaps or misalignments can lead to weak welds. Ensure the edges fit tightly together. Use clamps or fixtures to hold the parts in place. A snug fit reduces the chance of blow through. Check the alignment before starting to weld. Proper fit-up makes the welding process smoother and more efficient. “`
Credit: www.mig-welding.co.uk
Using Backing Bars And Heat Sinks
Welding blow-through can be a real hassle, especially for beginners. It happens when the weld melts through the metal, creating unwanted holes. But don’t worry! One effective way to prevent this is by using backing bars and heat sinks. These tools help control the heat and support the weld. Let’s dive into how they work and the materials you can use.
Purpose Of Backing Bars
Backing bars are placed behind the weld joint. They provide support and prevent the molten metal from falling through. Think of them as a safety net. They are especially useful when welding thin materials. Here’s why you should consider using them:
- Support: They keep the weld pool stable and prevent sagging.
- Heat Control: They absorb some of the heat, reducing the chances of blow-through.
- Smooth Finish: They help achieve a cleaner, smoother weld.
Imagine trying to bake a cake without a baking tin. The batter would go everywhere, right? The same idea applies here. Backing bars keep everything in place, ensuring a solid weld.
Heat Sink Materials
Now, let’s talk about heat sinks. These are materials that absorb and dissipate heat. They are placed near the weld area to draw away excess heat. This prevents the metal from getting too hot and melting through. Common materials for heat sinks include:
- Copper: Excellent at absorbing heat. It’s easy to find and use.
- Aluminum: Lightweight and effective. It’s a bit cheaper than copper.
- Steel: Durable and strong. It’s a good choice for heavy-duty welding.
Using the right material can make a big difference. For example, I once tried welding without a heat sink, and it was a disaster! The metal got too hot, and I ended up with more holes than welds. But with a copper heat sink, the process was much smoother.
So, next time you’re welding, give backing bars and heat sinks a try. They might just save you from a lot of frustration and help you achieve that perfect weld.
Patch And Repair Methods
So, you’ve encountered welding blow throughs. It’s frustrating, right? Don’t worry, it happens to the best of us. Thankfully, there are effective methods to patch and repair these holes, ensuring your work looks as good as new. Let’s dive into some practical techniques.
Filling Holes
First things first, let’s tackle those pesky holes. The key here is to fill them properly. Here’s how:
- Use Copper Backing: Place a piece of copper behind the hole. It helps absorb the heat and prevents further blow through.
- Spot Weld: Begin by spot welding around the edges of the hole. This creates a frame and makes the filling process easier.
- Build Up in Layers: Fill the hole gradually. Weld in small bursts, allowing the material to cool between each pass. This avoids overheating and more blow throughs.
Once the hole is filled, it’s crucial to ensure the surface is smooth and ready for the next steps.
Grinding And Finishing
Now that the hole is filled, let’s move on to grinding and finishing. This process is essential for a seamless look.
- Grind the Excess Weld: Use a grinder to remove the excess weld metal. Be gentle to avoid creating new holes.
- Sand the Surface: After grinding, sand the area to smooth out any rough edges. This step is key for a polished finish.
- Inspect and Touch Up: Finally, inspect the repaired area. If needed, do some touch-ups with a fine sanding block.
And there you have it! Your repair should now be seamless. Remember, patience is vital. Rushing through can lead to more issues. Take your time, and you’ll master these techniques in no time.
Got any welding tips or stories to share? I’d love to hear them! Drop a comment below.
Common Mistakes To Avoid
Welding is a skill that takes patience and practice. When you’re trying to fix welding blow through, it’s easy to make mistakes. Knowing what to avoid can save you time and frustration. Here are some common pitfalls and how to steer clear of them.
Rushing The Process
We all know the saying, “haste makes waste.” This couldn’t be truer when it comes to welding. Here are a few reasons why rushing can cause issues:
- Insufficient Preparation: Not taking the time to set up properly can lead to poor results.
- Overheating: Working too fast can make you apply too much heat, leading to blow through.
- Skipping Steps: Missing crucial steps in the welding process can compromise the integrity of your weld.
Remember, slow and steady wins the race. Take your time to ensure each step is done correctly.
Ignoring Material Thickness
Not all materials are created equal. Different thicknesses require different techniques. Here’s why paying attention to material thickness is crucial:
- Heat Control: Thinner materials need less heat. Too much heat can easily cause blow through.
- Proper Settings: Adjust your welding machine settings based on the material thickness.
- Technique Adjustments: Use different welding techniques for different thicknesses to avoid issues.
Imagine trying to fix a delicate glass sculpture with a sledgehammer. It just wouldn’t work, right? The same goes for welding. Use the right tools and techniques for the job at hand.
By avoiding these common mistakes, you’ll be well on your way to fixing welding blow through like a pro. Take your time, pay attention to the details, and you’ll see better results in no time.
Frequently Asked Questions
Why Are My Welds Blowing Through?
Your welds are blowing through likely due to excessive heat, improper settings, or thin base metal. Reduce the heat or adjust the settings.
Why Do Welders Drink Milk After Welding?
Welders drink milk after welding to help reduce metal fume fever. The calcium in milk may bind to toxic metals. This helps prevent absorption in the body.
How Would You Fix Arc Blow?
To fix arc blow, adjust the electrode angle and reduce welding current. Use AC welding instead of DC. Ensure proper grounding and minimize arc length.
How Do You Stop Blowing Holes When Welding?
To stop blowing holes when welding, reduce the heat setting. Use a shorter arc length and steady hand. Opt for thicker materials if possible. Adjust the welding speed to avoid overheating. Choose the correct electrode size for the job.
Conclusion
Fixing welding blow through doesn’t have to be difficult. Use proper technique. Control heat. Choose the right materials. Practice makes perfect. Keep adjustments simple. Always inspect your work. Stay patient. Follow these tips. Your welding skills will improve. No more blow through.
Happy welding!

