Using a welder at home can be a valuable skill. It opens up many possibilities for DIY projects and repairs.
Learning to weld may seem daunting at first, but it is quite manageable with the right guidance. Welders can join metal parts together, making them essential tools for various home projects. Before you start, it’s important to understand the basics of welding, including safety measures and equipment.
This blog will guide you through the steps to use a welder at home, helping you get comfortable with this powerful tool. Whether you’re fixing a gate or crafting a metal sculpture, welding can make your projects stronger and more durable. Let’s dive into the world of home welding and discover how you can make the most of this skill.
Getting Started With Welding
Welding at home can be fun and useful. With the right tools and safety measures, you can create strong metal joints. This guide will help you get started on your welding journey.
Choosing The Right Welder
Selecting the correct welder is crucial. For beginners, a MIG welder is a great choice. It is user-friendly and good for light projects. If you need more precision, consider a TIG welder. Stick welders are another option, especially for thicker materials. Consider the type of projects you plan to do. This will help you decide which welder suits you best.
Essential Welding Accessories
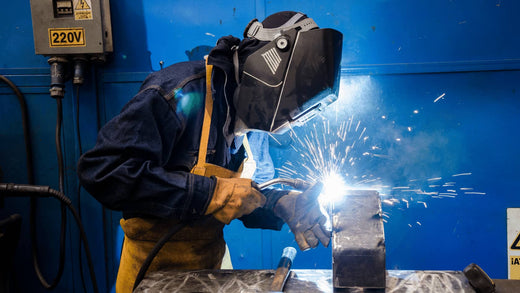
Welding requires more than just a welder. Safety gear is essential. You need a welding helmet to protect your eyes. Gloves and a welding jacket will keep your skin safe. Use a fire-resistant apron for added protection. Always have a fire extinguisher nearby. Invest in good quality accessories. They will make your welding experience safer and more enjoyable.
Safety Precautions
Welding at home can be a rewarding and useful skill. But safety must always come first. This section will guide you through important safety precautions. These steps will help ensure your welding projects are safe and successful.
Protective Gear
Wearing the right protective gear is essential. A welding helmet protects your eyes from sparks and bright light. Use gloves to shield your hands from heat and sharp metal. Wear a long-sleeved shirt and pants to protect your skin from burns. Sturdy boots protect your feet from falling objects. Finally, use earplugs to prevent hearing damage from loud noises.
Safe Workspace Setup
Set up your workspace in a well-ventilated area. This helps remove harmful fumes from the air. Keep a fire extinguisher nearby for emergencies. Remove any flammable materials from your workspace. Ensure your work surface is stable and at a comfortable height. Use clamps to secure your materials and prevent movement during welding. Make sure you have good lighting to see your work clearly. Finally, keep your workspace clean and organized to avoid accidents.
Understanding Welding Types
Welding at home can be an exciting and rewarding skill to learn. Understanding the different types of welding is essential for beginners. Each type has its own advantages and specific uses. Knowing which type to use can make your welding projects more successful.
Mig Welding
MIG welding, or Metal Inert Gas welding, is often used by beginners. This method uses a continuous wire feed. The wire acts as both the electrode and the filler material. It is easy to learn and ideal for welding thin materials. MIG welding is great for home projects like repairing gates or making metal furniture.
Tig Welding
TIG welding, or Tungsten Inert Gas welding, is more precise. It uses a non-consumable tungsten electrode. This method is perfect for welding thin materials like aluminum and stainless steel. TIG welding requires more skill and practice. It is ideal for projects that need clean and precise welds.
Setting Up Your Welder
Setting up your welder at home may seem daunting. But with the right steps, it becomes manageable. Ensuring your welder is set up correctly is crucial for safety and efficiency. Let’s dive into the essential steps for setting up your welder.
Connecting Power Supply
First, identify the power requirements of your welder. Some welders need 110V, while others need 220V. Check your welder’s manual to confirm. Ensure your power outlet matches the welder’s needs. If your welder requires 220V, you might need an electrician. Plug your welder into the power outlet securely. Never use damaged cords or outlets.
Adjusting Settings
Adjusting the settings on your welder is crucial for quality welds. Start by selecting the right amperage. This depends on the material and thickness. Refer to the welder’s manual for guidance. Next, set the voltage. The voltage setting affects the weld penetration. Use the chart provided by your welder’s manufacturer. Adjust the wire feed speed if using a MIG welder. The speed should match the material and thickness. Test your settings on scrap material first. This ensures the settings are correct before starting your project.
Basic Welding Techniques
Welding at home can be both a rewarding hobby and a useful skill to have. Whether you’re fixing a broken gate or crafting metal art, understanding the basic welding techniques is essential. In this section, we’ll cover two fundamental skills: Striking an Arc and Maintaining a Steady Hand. These will set you on the path to becoming a confident home welder.
Striking An Arc
Striking an arc is like lighting a match. You need to create a spark to start the welding process. Here’s how you can do it:
- Preparation: Ensure your workspace is clean and free of flammable materials. Safety first!
- Position: Hold the welding rod at a 15-degree angle to the metal piece.
- Strike: Quickly tap the rod against the metal and lift it slightly. This should create the arc.
- Consistency: Practice makes perfect. Keep trying until you get a steady arc.
Remember the first time you tried to light a match? It might have taken a few tries, but you got it. Welding is quite similar. Patience and practice are key.
Maintaining A Steady Hand
Once you’ve struck the arc, maintaining a steady hand is crucial for a clean weld. Here are some tips to help you:
- Stabilize: Rest your elbow on a stable surface if possible. This reduces shaking.
- Speed: Move the rod slowly and steadily. Fast movements can create weak welds.
- Focus: Keep your eyes on the weld pool (the melted metal). This helps you control the weld.
- Practice: Just like riding a bike, the more you do it, the better you get.
Think of it like painting a straight line. If your hand wobbles, the line gets crooked. A steady hand in welding ensures a strong and neat weld.
In summary, mastering these basic welding techniques—striking an arc and maintaining a steady hand—will greatly enhance your welding projects at home. With some practice and patience, you’ll be creating strong, reliable welds in no time. So, gear up, stay safe, and happy welding!

Credit: www.arccaptain.com
Common Welding Projects
Welding at home opens up a world of creative and practical projects. With a welder, you can fix broken items and craft unique pieces. Here are some common welding projects you can try.
Repairing Metal Items
Many household items break over time. Welders can fix these. For example, you can repair metal chairs, tables, and garden tools. Welding can make these items sturdy again.
You can also fix car parts. A small crack in the exhaust can be welded. This can save money on repairs. It also extends the life of your car.
Don’t forget about broken gates and fences. Welding can mend these too. This keeps your property secure and looking good.
Creating Metal Art
Welding is not just for repairs. You can also create beautiful metal art. Think of garden sculptures or wall art. Welders can join different shapes and sizes of metal.
Personalize your home with custom designs. Make a unique piece for your living room. Or create outdoor art that stands out.
Try making gifts for friends and family. A handmade metal piece shows thought and effort. It’s a special way to share your talent.
With some practice, your welding skills can turn ideas into reality. Start with simple projects. Then move on to more complex designs. The possibilities are endless.
Troubleshooting Tips
Learning to use a welder at home can seem daunting. But don’t worry! Even experienced welders face issues sometimes. Here are some troubleshooting tips to help you out.
Dealing With Weld Defects
Weld defects can happen to anyone. One common defect is porosity. This happens when gas gets trapped in the weld. To fix this, check your gas flow. Make sure there are no leaks. Also, clean the metal surface before you start welding.
Another defect is cracks. Cracks can weaken your weld. To avoid this, control your heat. Too much heat can cause cracks. Use a slower, steady hand. This will help you manage the heat better.
Avoiding Common Mistakes
Starting out, you may make some common mistakes. One mistake is improper joint preparation. The joint must be clean and fit well. Use a wire brush to clean the area. Also, ensure the pieces fit snugly.
Another mistake is incorrect electrode angle. Holding the electrode at the wrong angle can cause poor welds. Keep the electrode at about 15 degrees. This will help you get a cleaner weld.
Lastly, avoid moving too fast. A fast hand can lead to weak welds. Slow down and take your time. This will give you better results.

Credit: worksitetool.com
Maintaining Your Welder
Keeping your welder in good shape at home is important. Regularly clean it and check for any loose parts. Always store it in a dry place to prevent rust.
Keeping your welder in top shape ensures it works well for years. Regular maintenance also keeps your welds clean and strong. Here are some tips to help you maintain your welder at home.Cleaning And Storage
Always unplug your welder before cleaning. Dust and dirt can build up inside. Use compressed air to blow out debris. Keep the exterior clean by wiping it down with a damp cloth. Store your welder in a dry place. Moisture can damage electrical parts. Use a cover to protect it from dust and dirt. Make sure to coil the cables neatly to avoid damage.Regular Maintenance Checks
Check the cables and connectors regularly. Look for wear or damage. Replace any damaged parts immediately. Check the electrode holder and ground clamp for wear. Inspect the consumables. Replace worn-out nozzles and contact tips. Check the gas flow if you use a gas welder. Ensure the hoses and regulators are in good condition. Perform a test weld periodically. This helps you spot any issues early. Regular checks keep your welder running smoothly and safely. “`
Credit: www.youtube.com
Frequently Asked Questions
Can You Use A Welder At Home?
Yes, you can use a welder at home. Ensure proper safety measures and adequate ventilation. Follow guidelines and local regulations.
Can I Plug My Welder Into My House?
Yes, you can plug a welder into your house if the electrical system meets the welder’s requirements. Ensure proper voltage, amperage, and circuit compatibility. Consult an electrician for safety.
What Is The Easiest Welder To Use For Beginners?
The easiest welder for beginners is a MIG welder. It’s user-friendly and ideal for learning basic welding techniques.
Can You Run A Welder Off A Regular Outlet?
Yes, you can run a welder off a regular outlet. Ensure the welder’s power requirements match the outlet’s capacity. Most smaller welders work fine with a standard 120V outlet. For larger welders, a 240V outlet may be necessary. Always check the welder’s specifications and consult an electrician if unsure.
Conclusion
Using a welder at home is easier than you think. Follow safety guidelines. Practice regularly. Understand your welder’s settings. Start with simple projects. Always wear protective gear. Keep your workspace organized. Ensure proper ventilation. Clean your tools after use. Join online forums for tips.
Happy welding!

