Learning to use a welding machine can seem daunting at first. But with clear steps, it becomes manageable.
Welding is a useful skill in many fields. Whether for DIY projects or professional tasks, mastering a welding machine can save time and money. This guide will break down the process into simple steps. You’ll understand the basics and feel more confident using a welding machine.
Safety is crucial, so we’ll also cover important precautions. With the right approach, anyone can learn to weld effectively. Ready to start? Let’s dive into the step-by-step instructions for using a welding machine.

Credit: www.youtube.com
Introduction To Welding
Welding is a powerful skill that allows you to join materials together. Whether you are repairing a broken gate or creating something new, understanding how to use a welding machine can be incredibly valuable. In this section, we will explore the basics of welding and why it is an essential skill to learn.
Importance Of Welding Skills
Why should you learn welding? Here are a few reasons:
- Practical Applications: Welding skills are useful in many fields, such as construction, automotive repair, and manufacturing.
- Job Opportunities: Skilled welders are in high demand. Knowing how to weld can open doors to new career opportunities.
- Creativity and Repair: Welding allows you to fix things and create new items, from artistic sculptures to functional furniture.
Imagine being able to fix your own metal items or create something entirely new. Welding skills can make this possible!
Types Of Welding Machines
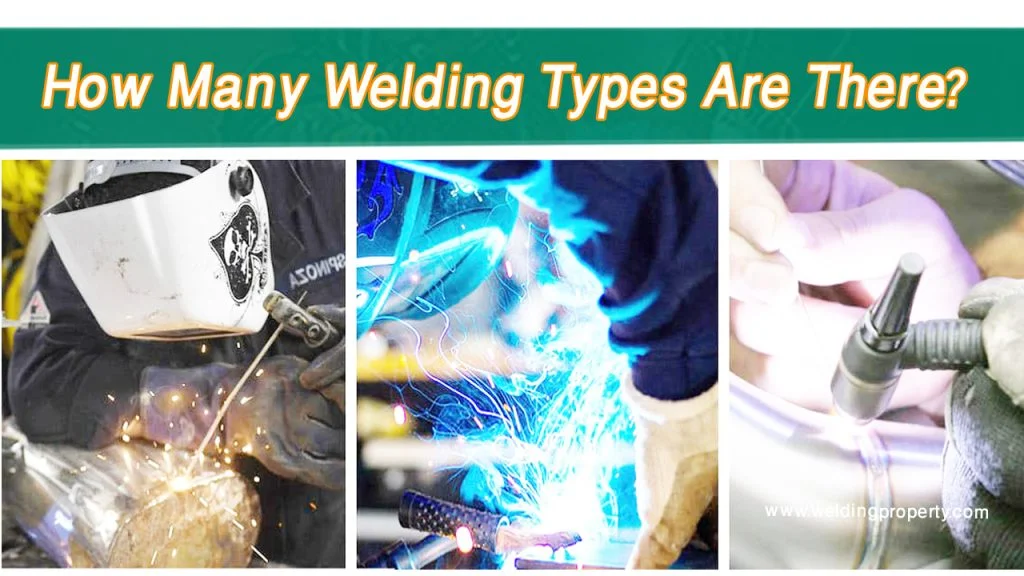
There are several types of welding machines, each with its own unique features. Here are the most common ones:
| Type | Description |
|---|---|
| MIG (Metal Inert Gas) Welding | MIG welding is easy to learn and perfect for beginners. It uses a wire feed to join metals. |
| TIG (Tungsten Inert Gas) Welding | TIG welding is more precise and offers cleaner welds. It is often used for thinner materials. |
| Stick Welding | Stick welding is versatile and can be used outdoors. It is great for thicker materials and heavy-duty jobs. |
Choosing the right welding machine depends on the job you want to do. Are you looking to repair small items or take on larger projects? Knowing the differences can help you make the best choice.
So, are you ready to dive into the world of welding? Let’s get started on this exciting journey together!
Safety Precautions
Welding can be dangerous if you do not follow safety precautions. Always prioritize safety to avoid injuries. Proper gear and a well-prepared work area are essential.
Protective Gear
Wear a welding helmet to protect your eyes from the bright light. Use gloves to shield your hands from sparks and heat. A long-sleeved shirt and pants will protect your skin from burns. Do not forget sturdy boots to protect your feet from falling objects.
Work Area Preparation
Ensure your work area is clean and free of flammable materials. Have a fire extinguisher nearby in case of emergencies. Use proper ventilation to avoid inhaling harmful fumes. Keep your tools and materials organized to prevent accidents.
Welding Machine Components
Understanding the components of a welding machine is crucial for any welding project. Knowing what each part does can help you use the machine correctly and safely. This section will break down the main components of a welding machine.
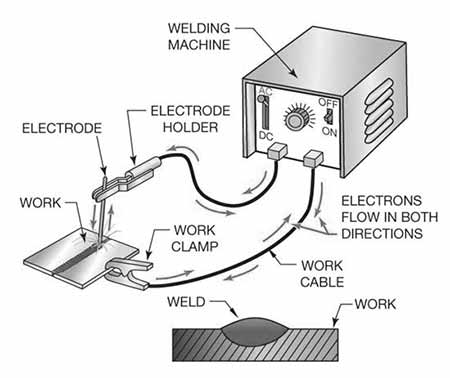
Power Source
The power source provides the necessary electricity for welding. It converts standard electrical current into a usable form for welding. The power source can be either AC or DC. AC stands for alternating current, while DC stands for direct current. Each type has its specific use cases and benefits. Choose the power source based on the welding job and the materials you are working with.
Electrodes
Electrodes are the metal rods that conduct electricity to the welding area. They come in different types and sizes. Some electrodes are consumable, meaning they melt during welding. Others are non-consumable and do not melt. Select the right electrode based on the welding method and material. Using the correct electrode ensures a strong and clean weld.
Ground Clamp
The ground clamp completes the electrical circuit needed for welding. It attaches to the workpiece or the welding table. The clamp ensures that the electrical current flows smoothly. A secure ground clamp is vital for a stable welding arc. Always check the connection before starting your weld. A poor connection can lead to weak welds and safety hazards.

Credit: www.cruxweld.com
Setting Up The Welding Machine
Setting up your welding machine correctly is crucial for a smooth and safe welding experience. Whether you are a beginner or have some experience, following these steps ensures you get the best results. Let’s break it down into simple tasks so you can get started without any hassle.
Connecting Components
First things first, you need to connect the different parts of your welding machine. Think of it as setting up a new gadget. You wouldn’t want to miss any cables, right?
- Power Cable: Plug the power cable into a grounded electrical outlet. Safety first!
- Ground Clamp: Attach the ground clamp to your workpiece or work table. This helps complete the circuit.
- Electrode Holder: Connect the electrode holder to the positive terminal. It holds the welding rod.
Double-check every connection. It’s better to be safe than sorry, especially when dealing with electricity.
Adjusting Settings
Now that everything is connected, it’s time to adjust the settings of your welding machine. This step is like setting the temperature on your oven before baking a cake.
- Current Type: Decide if you need AC or DC. AC is good for thicker metals; DC is smoother and more stable.
- Amperage: Set the amperage according to the thickness of the metal. Thicker metals need higher amperage.
- Voltage: Adjust the voltage based on the type of weld. Higher voltage for deep penetration, lower for more delicate work.
These settings can feel overwhelming at first. But with practice, you’ll get the hang of it. Imagine it like tuning a guitar; it takes a bit of time, but soon you’ll do it without even thinking.
To sum up, setting up your welding machine involves connecting all the components properly and adjusting the settings according to your project needs. By following these steps, you are setting yourself up for success. Ready to get your hands dirty?
Preparing Materials
Properly preparing materials is key for a successful weld. This stage ensures that everything fits together and the weld holds strong. Follow these steps to prepare your materials.
Cleaning Surfaces
First, clean the surfaces you plan to weld. Remove all rust, paint, and dirt. Use a wire brush or grinder. Clean surfaces ensure a better weld. Dirt and rust can weaken the weld joint.
Aligning Parts
Next, align the parts to be welded. Use clamps or magnets to hold them in place. Alignment is crucial for a strong weld. Misaligned parts can lead to weak joints and poor results. Check the alignment before welding. Make adjustments as needed.
Basic Welding Techniques
Welding is an essential skill in many trades and DIY projects. Learning basic welding techniques is crucial for safe and effective work. This guide will walk you through the steps to get started.
Striking An Arc
Striking an arc is the first step in welding. Begin by holding the electrode about an inch above the metal. Lower it until it touches the surface. Quickly lift the electrode slightly to start the arc. It may take a few tries to get it right. Practice makes perfect.
Maintaining The Arc
Maintaining the arc is key to a good weld. Keep a steady hand and focus. Move the electrode at a consistent speed. Hold it at the correct distance from the metal. Too close and the arc will extinguish. Too far and the arc will be weak. Find the balance with practice.
Common Welding Processes
Welding can seem complex, especially if you are new to it. But don’t worry! We’ll break it down into simple steps. Let’s start by understanding the most common welding processes. These include MIG welding, TIG welding, and Stick welding. Each has its unique methods and uses. Let’s dive in!
Mig Welding
MIG stands for Metal Inert Gas. This welding is also known as Gas Metal Arc Welding (GMAW). It’s popular because it’s easy to learn and works well with different metals.
- How it works: MIG welding uses a wire connected to an electrode current. The wire melts and joins the metal pieces together.
- Best for: This process is best for welding thin to medium-thick metals, like aluminum and steel.
- Pros: It’s fast and efficient. Plus, it produces clean welds with less spatter.
- Cons: It requires a constant voltage power source and might not be perfect for outdoor use because of wind interference.
Tig Welding
TIG, or Tungsten Inert Gas welding, is also known as Gas Tungsten Arc Welding (GTAW). This method is highly precise and gives strong, clean welds.
- How it works: TIG welding uses a non-consumable tungsten electrode. The heat and arc melt the metal, which is then joined together. A filler rod is used if needed.
- Best for: This process is great for thin metals and can be used for welding aluminum, stainless steel, and copper alloys.
- Pros: It offers high-quality, clean, and precise welds. It’s perfect for detailed and artistic work.
- Cons: It’s slower and more complex than MIG welding. Also, it requires a high skill level to master.
Stick Welding
Stick welding, or Shielded Metal Arc Welding (SMAW), is one of the oldest and most versatile welding methods. It is widely used for its simplicity and effectiveness.
- How it works: This method uses a consumable electrode coated in flux. The arc between the electrode and the metal melts the electrode and joins the pieces.
- Best for: Stick welding is excellent for thicker metals and can be used on iron, steel, and other heavy materials.
- Pros: It’s simple and doesn’t require shielding gas. It works well outdoors and in windy conditions.
- Cons: It can produce more spatter and requires more cleanup. Plus, it’s less effective on thin metals.
Each of these welding processes has its unique benefits and challenges. Choosing the right one depends on your project and the materials you are working with. Remember, practice makes perfect! So, don’t be afraid to try and see which method suits you best.
Troubleshooting Tips
When you’re learning to use a welding machine, it’s normal to run into some bumps along the way. But don’t worry, troubleshooting is part of the journey! This section will help you handle common problems that might pop up. Let’s dive into some practical tips to keep your welding process smooth and your equipment in top shape.
Dealing With Defects
Welding defects can be frustrating, but they’re often easy to fix once you know what to look for. Here are some common issues and how to solve them:
- Porosity: This occurs when gas gets trapped in the weld. To prevent this, ensure your work area is clean and free of contaminants. Also, check your gas flow settings.
- Cracks: If you see cracks in your weld, it could be due to too much heat. Try reducing the heat input or making multiple passes to distribute the heat more evenly.
- Undercutting: This happens when the weld metal fails to fill the joint properly. Adjust your travel speed and angle to ensure the weld metal is adequately deposited.
Do you remember the first time you tried to bake a cake and it came out flat? Welding can be similar. Sometimes, a small adjustment can make a big difference in your results.
Maintaining Equipment
Just like your car needs regular oil changes, your welding machine needs some TLC to stay in peak condition. Here’s how you can keep your equipment running smoothly:
- Regular Cleaning: Dust and debris can accumulate on your welding machine. Wipe down the exterior regularly and clean the vents to prevent overheating.
- Inspect Cables and Connections: Check all cables and connections for signs of wear or damage. Replace any frayed wires to avoid electrical issues.
- Gas Supply: Ensure your gas cylinders are full and the regulators are set correctly. An inconsistent gas flow can ruin your weld.
Think of your welding machine as a trusty sidekick. If you treat it well, it will be there for you when you need it most. Regular maintenance isn’t just a chore; it’s an investment in your welding success!
By keeping an eye on these troubleshooting tips, you’ll be well on your way to mastering your welding machine. Remember, every expert welder started as a beginner. With patience and practice, you’ll get there too!
Practice And Improvement
Learning to weld can be quite the adventure. When you’re starting out, it’s all about practice and improvement. The more you practice, the better you get. It’s like learning to ride a bike – wobbly at first, but soon you’re cruising. So, let’s dive into how you can hone your welding skills and become a pro.
Practicing Welds
First things first, let’s talk about practicing welds. Grab some scrap metal and get to work. Start with simple welds and gradually move to more complex ones. Here’s a quick guide to get you started:
- Butt Welds: These are basic welds where two pieces of metal are joined end to end. Practice keeping the weld straight and consistent.
- Lap Welds: This involves overlapping two pieces of metal and welding along the edge. Focus on even heat distribution.
- Fillet Welds: Often used in T-joints, this type of weld is crucial for structural integrity. Practice maintaining a smooth, even bead.
Remember, consistency is key. Weld after weld, you’ll notice improvements. Don’t rush; take your time and focus on the technique.
Seeking Feedback
Ever heard the saying, “Two heads are better than one”? When it comes to welding, it couldn’t be truer. Seeking feedback can accelerate your learning curve.
- Mentorship: Find a seasoned welder who can guide you. They can spot mistakes that you might miss and offer invaluable advice.
- Peer Reviews: Practice with fellow beginners and critique each other’s work. It’s a great way to learn and improve together.
- Online Forums: Join welding communities online. Post pictures of your welds and ask for feedback. Welders worldwide are often happy to help.
Constructive criticism can be tough, but it’s essential for growth. Embrace it and use it to refine your skills.
So, what are you waiting for? Get out there, start practicing, and don’t be afraid to ask for help. Happy welding!

Credit: www.wikihow.com
Frequently Asked Questions
How To Set Up A Welding Machine Step By Step For Beginners?
First, read the welding machine’s manual. Choose the correct welding rod. Connect the ground clamp securely. Set the appropriate current and voltage. Wear protective gear and start welding.
How Do You Use A Welding Machine?
To use a welding machine, wear safety gear. Connect the machine to a power source. Select appropriate settings for the material. Attach the ground clamp. Hold the welding torch at the correct angle. Strike the arc and maintain steady movement.
Turn off the machine after use.
What Is The Easiest Way To Weld For Beginners?
The easiest welding method for beginners is MIG welding. It uses a wire electrode and requires minimal setup. MIG welding provides clean welds, making it ideal for novices.
What Are The Basics Of Welding Machine?
A welding machine joins materials using heat. It consists of a power source, electrode, and grounding clamp. Different types include MIG, TIG, and Stick welders. Safety gear is essential.
Conclusion
Using a welding machine can seem tough at first. But with practice, it gets easier. Follow each step carefully and always prioritize safety. Double-check your equipment before starting. Proper gear is crucial for protection. Remember, good preparation leads to better results.
Try to learn from each welding session. This helps in improving your skills. Keep practicing, stay patient, and soon you will weld like a pro. Happy welding!

